A Tale of Two Ball Joints – 2nd Installment

Since Dicken’s A Tale of Two Cities was originally published as 31 installments, it is only fitting that my ball joint tale must continue.

I received the lower ball joint from ISPwest and compared it to the one from AirHeadParts. The ISP version is on the left, can you see a difference?


I also snapped some images of each ball joint next to the opening for it in the spindle, here is the AirHeadParts one…

And here is the ISPwest one…

Obviously, the ISPwest supplied ball joint is correct, while the AirHeadParts one is not correct for the part number.

Time to install the correct ball joint and rebuild the left front wheel. (I will contact AirHeadParts for a return and refund Monday.)

Now That’s What I Call Progress vol. 41

Well the engine is finally presentable!

Actually, after I snapped these pictures with my camera, I went ahead and installed the fuel line connecting the two banks a fuel injectors.  I also placed the air cleaner and oil filler on, then covered it all with a sheet of plastic.

I can now work on fabricating the muffler system, but there were other parts that got delivered yesterday….

The Key to a Successful Weekend

I arrive home from work to find a couple packages of parts at the door. When I go to the mailbox, there is also a padded envelope.

When I picked up the car, the previous owner had lost the ignition lock cylinder and keys. During my massive parts order, I had ordered a cheap ignition cylinder. Once I plopped it in and tested it, I moved on to the door locks. I knew that the key would not be able to unlock the doors, but was assuming that I could disassemble the lock and make it work. Worst case scenario would be to remove all of the lock pins to allow any key to turn the cylinder. However, that was not even possible since the key that came with the ignition would not even fit into the door locks. Once again, off to The Samba I went… $32 and 4 days later, I am holding two VW keys cut to match the code for my doors and hatch.

So, my car is not a one=key car like it should be, but for now the $7 ignition is a better bet that an original on modified to my key code for $65. Maybe later down the road, once I know everything else in the car works, I might shell out for the matching ignition key.

Anyway, that is one more item to check off the list, and I also have two more packages of parts to work on this weekend. But, first, the engine needs to be finished…. more zen…. ahh uhmm…. ahh uhmmm

Be Zen with your Tins

There is often very misleading information all over the internet. However, at times, there is some sound advice that can be found. In this case, it is words found on The Samba stating “Be Zen with your Tins”

At first, I assumed that this was just one of those things, like; don’t run with scissors, be sure to chew your food, walk don’t run, etc.

Being all macho, I planned to finish the engine assembly tonight and began with the tins on the 3&4 side… and that is as far as I got. Considering how much of a large puzzle an automotive engine can be, when you add the pact that there are about 11 pieces of cooling tins, I had never actually seen this motor completely assembled, and that all the pieces have been disassembled for several weeks, it was very slow going. Being careful not to bend, break or strip anything I never made it past that side of the engine. The cooling tins are rather tricky and you must use a great amount of patience when assembling them, Be Zen with your Tins, or things will simply get worse.

Two nights into the reassembly that I thought would take a couple of hours and there is still more work to be done…

Being a Head case

I got the call that my heads were ready. So, I hopped in the car and drove out to pick them up, along with a header and a set of push rod tubes. After a rather unproductive rest of the day at work, I rushed home to start putting the engine back together and thus began a lesson in patience…

I had already somewhat assembled the motor, simply so that I did not have parts all over the garage. So, the first step was to remove everything again. Once I got the motor stripped back down, I started installing the heads. After some struggling, I was able to get a couple nuts started on the head studs, which allowed me to begin tightening them to pull the head on. [1/2 install] As I moved to the other head, I realized that I forgot washers on the studs of the first head.

Once I got both heads on (with washers) and properly torqued, I then realized that I had neglected to clean the dust that had collected in the cylinders. [1 1/2 installs] Next came removing the heads again and performing a proper installation of the heads. [2 1/2 installs]

I had planned to have the entire engine assembled this night, however, taking advice from other, I learned to know when to walk away and call it a night.

Taillight Update

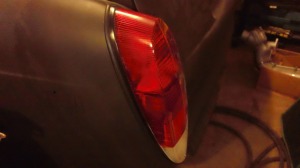
After resurfacing the taillight housings, I finally got my new lenses in and installed. On the driver’s side, I had to reshape the portion of the fender where the light mounts. This was actually where I was able to develop some “Bondo-skills”. The lower portion of the fender opening was somehow angles dowm, so I simply built it back up with filler and made it level. The below image shows the complete taillight assembly temporarily installed. I have all the seals replaced, however I only mounted it so that I could keep everything together. It will come back off before the car goes to paint.

New lens, seals and a black painted housing, instead of the rough looking metal look it previously was.

I call it Garage Art, wife calls it an Obsession

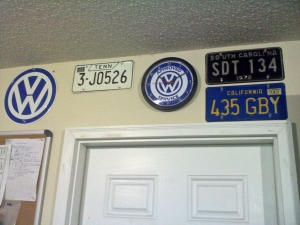
OK, so I have added some more items to the walls of the garage. I still have the very large cut-away image of a squareback along one wall. I felt it was time to add some license plates. I mean seriously, what kind of garage / workshop doesn’t have old license plates on the walls?

The little alarm clock that I was using for a clock and radio was simply not cutting it. As a radio, it only picked up a local rock station. No real problem with that, except do I really want to be listening to “angry white boy music” (which I like) while working on the car? I don’t think so, the last thing I want is to get angry and break even more things than I already do. Also, the radio function on the alarm clock only works for 59 minutes at a time. Of course, it turns off right in the middle of something that I cannot stop. So, I set up a small computer in the garage so that I can run iTunes on it. This solved the music problem. However, the CMOS battery on the computer is dead, meaning that every time the the PC reboots, the clock resets to midnight. So, I needed to add a normal clock to the garage wall. Luckily, I found a VW clock on eBay. Also note, for a computer monitor, I mounted a 42 in. plasma on the wall over my work bench. OK, so maybe I am getting a little carried away.

I had already picked up a 1972 Knoxville, Tennessee tag at a show, so it went on the wall. Since I had what of been, in theory, the tag that was first on the car (a car from when I was born), I began searching for more old and historically important license plates. through the magic of eBay, I found a 1972 South Carolina license plate (The year and state of my birth) and a 1974 California license plate (the year and state of my wife’s birth).


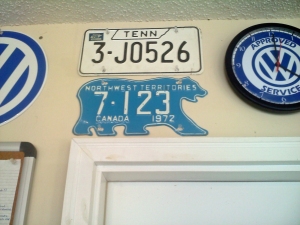
A co-worker had informed me that the Northwest Territories in Canada used license plates that are shaped like a polar bear. I thought that this was too cool and began searching on eBay for one. Due to the uniqueness of these tags, they quickly become rather expensive. After about a week, I was able to score a 1972 polar bear tag. Up on the wall it went!


As seen in the pictures, I also got an 11in VW logo sign. I also have a “Parts & Service” sign with “Mr. Bubblehead” on the way…

Banging my Head

First a little background, when I dropped the motor from the car, I needed to be able to lift it up onto a bench. In order to do this, I removed the exhaust system to shed a few pounds and reduce the overall size of the cumbersome chunk of metal. In this process, one of the Exhaust Studs came out of the Cylinder Head instead of the nut coming off. In addition, there were a couple more nuts that had to be, shall we say “persuaded” to let go? As a result, it was obvious to me that the Exhaust Studs needed to be changed. This is no big deal and a very good idea to change as much of the hardware as possible on a 40yr old car.

Well, it is a big deal. Needless to say that the studs do not want to move from their “home” of 40 years. Over the course of this time, through the process of heating and cooling, these studs have hardened and bonded to the head rather well. I first attempted to simply grab the studs with Vice-Grips and unscrew them from the head…. fail. Next, I placed two nuts on the stud and tightened them to each other, effectively transforming the stud into a bolt, and attempted to remove them….  fail. Now it was time to get serious. I welded nuts onto the studs and began spraying them with PB Blaster. I repeated the PB Blaster treatment every night for a week…. fail. (Along the way, insert various “tricks” with hitting them with hammers and such, with no success.)

By this time I had started to resign myself to the fact that I might just need to be on the look-out for new heads and began looking online at prices. I even found a “Stud Extractor” at Harbor Freight…. fail. By this point, I have one stud stripped out of the head, two of them sheered off flush with the head, one drilled through completely but with the threads still in the head, and the remaining studs in various states of “manglement” (of course that is a word, it came out of my mouth didn’t it). I now knew it was time to turn the heads over to a pro, the limit of my skills has been surpassed a long time ago.

I drop the heads off at a somewhat local VW shop on a Saturday morning. The owner asks if I am going to wait on them. I chuckle back, knowingly, “Na, take your time.” He thinks he will have them drilled out and finished with helicoils and new studs Monday morning…

Monday afternoon comes and my phone rings. He had gotten three studs out and then broke his drill bit in the fourth one. After spending a good amount of time trying to correct the mishap, he was about to give up and recommended that I might need new heads. (I don’t feel so bad now, he got to the same point I was at!) He called back with a quote for new heads and I asked him to wait a while before I make a decision. (It’s OK man, I know how you feel)

The next day he calls again, with new vigor. He has some stronger drill bits on the way and wants to take another stab at it. After some more work, he had one head finished and was now stuck on the other one. So, he orders more, different drill bits.

So I am still waiting for my heads… On the plus side, he claims to have a Type 3 Header in stock. Whenever my heads are ready, I will see if it actually is for a Type 3. If so, it will soon be time to fab up my Harley Davidson exhaust.

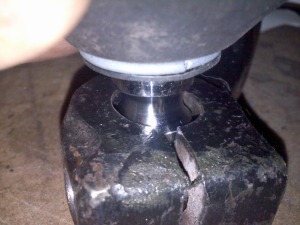
A Tale of Two Ball Joints

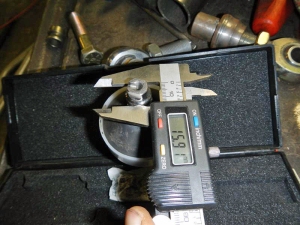
So my part orders arrived and I began assembling everything for the left front wheel. With the assistance and equipment of a friend, we got the bearings into the rotors. I placed the upper ball joint onto the spindle, without issue. However, the lower ball joint appeared too small to be able to be secured into the spindle. Out came the calipers…

The bottom post of the lower ball joint:


The opening in the spindle:


Obviously, the ball joint will not mount with a 2mm difference. Concerned that I have received the wrong ball joint, I contacted the dealer. After a day or so researching, they replied that all of their lower ball joints are 16mm. They went on to say that they checked with their suppliers and all were 16mm, they even said that they checked with several “type 3 people” and reported that type 3s have 16mm openings. Their conclusion was that someone had enlarged the opening.

At this point, I began to question the parts on my car. The left front fender (same area that I am doing the suspension work) had some damage to it that was previously repaired. Also worth noting is the fact that many of the front suspension parts on my year of car are shared with VW 411s and even Porsche 914s. (The rotors I ordered were even from a Porsche supplier.) At this point my assumption was that when the previous repairs were done to this section of the car, someone “found” a spindle that fit when bolted onto the car. Since the ball joints bolt onto the car, it was plausible that an entire wheel assembly was unbolted by the ball joints and transferred to this car. So, I went to the samba to solicit some assistance.

The overwhelming consensus was that ALL Type 3s use a 18mm lower ball joint. Was I over-thinking the situation, and the supplier was just trying to not take a part back? The simple answer is, yup. I contacted a part supplier that deals more with Type 3s and confirmed that their lower ball joints are 18mm, not the small 16mm ones used for Bugs.

Lesson learned…. be careful when ordering parts from a dealer that focuses mostly on Bugs, yet has some Type 3 parts that they think are interchangeable.

Once I receive the correct ball joint, I will take some pictures of it and send to the original supplier in hopes of convincing them that they provided the wrong part and not charge a restocking fee.

Beginning of an Exhaust System

As previously mentioned, I got some used Harley Davidson muffles for this project. The start of my new exhaust system was cleaning up and repairing the old Heater Boxes. After getting them stripped down and patched up. I added a couple layers of very high temperature primer and some light gray/silver exhaust paint. The “elbow” skid plate receive similar treatment and instead of reusing the long, narrow skid plate that only covers the bottom seam, I transferred the skid plates from the HD mufflers. Actually, the most difficult aspect of this process was determining the size of hose clamps I needed and finding them, eBay to the rescue! Here is a picture of the results…